
Description
Generate both scriptable object C# sources (one per table) and assets (one per row or inlined Serializable objects).
Setup
- Read this guide to learn how to create a data source and a job
- Switch to a data source and select a folder for C# source files for scriptable objects (use new, empty folder)
and press on "Generate C# source files" button to generate C# sources for scriptable objects.
One C# source file for each table will be generated.
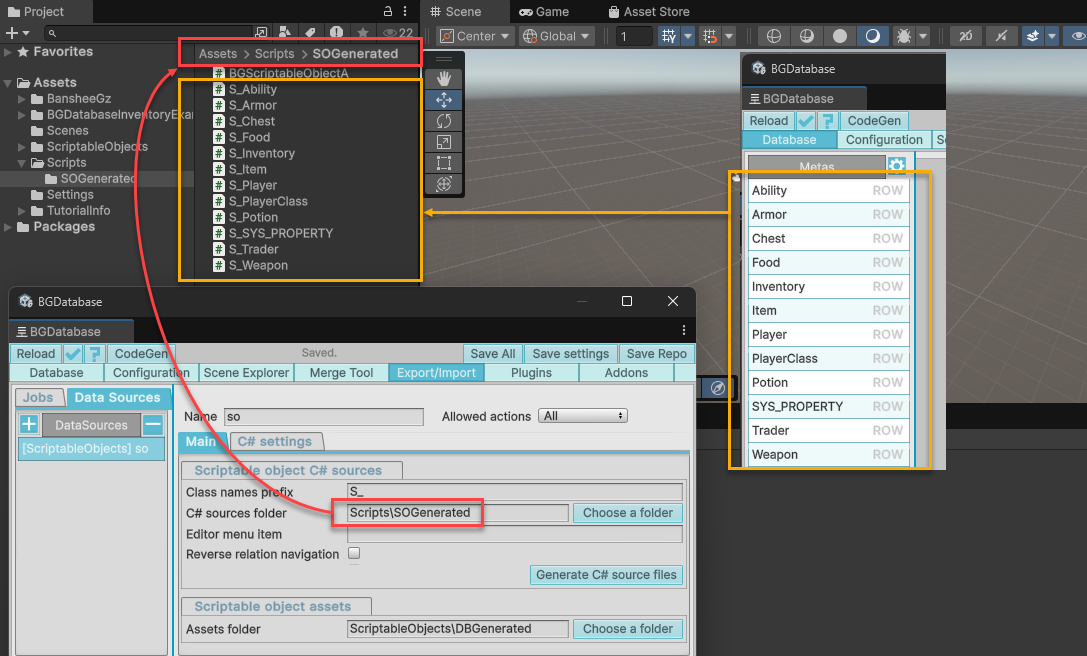
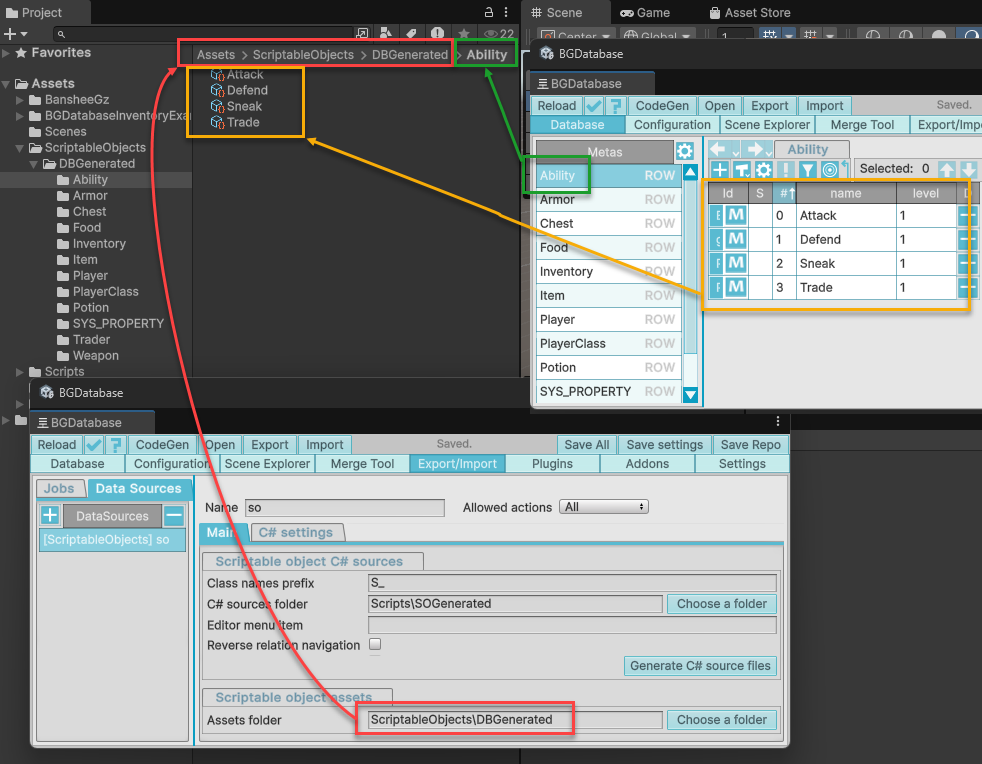
- Select a folder for scriptable object assets (use new, empty folder)
- Switch to a job and setup merge settings. Be careful with "Remove orphaned" setting, because it can lead to rows or assets being deleted if no matching row or asset is found.
-
Click on "Export" button to generate assets or "Import" button to transfer data from assets to database
Limitations and warnings
-
With inline config and custom field processors, introduced in BGDatabase version 1.9.3,
we believe that almost any scriptable object can be mapped to the database structure.
Archived warning
Data exchange with scriptable objects is not universal. If scriptable assets are created with our generated C# classes, it's possible to export/import any data from/to the database (as soon as the fields are supported). However, if scriptable assets are not created with our generated C# classes, there may be a chance that you will not be able to export/import data from such scriptable assets into the database. - Select 2 new, empty folders for generated C# sources and scriptable assets. Do not put other assets in these folders.
- Exporting data while assets are not yet exist is very slow, exporting 1000 rows can take 20-25 seconds. Transferring data to existing assets or importing data is quite fast.
- Exporting data creates one asset(file) per each row, keep this in mind if you have a lot of rows
- If you want to create a new asset and import it later to the database by duplicating existing asset,
make sure to clear
Idfield in duplicated asset, otherwise the asset will be ignored - Though merge settings are supported, we recommend to use data source settings to include/exclude tables/fields instead
- When you use "Remove orphaned" toggle in merge settings during export, it means that orphaned scriptable assets will be physically deleted.
- See the job's log for more information about synchronization process
- Not all fields are supported (read the section below for more details).
- Read the guide below about how to change settings or table/field names safely
C# sources and assets
Scriptable objects consist of two parts- C# source files for scriptable objects (with cs extension), which defines which fields each asset has and the assets, the instances of this C# class, stored in separate files (with asset extension). Both C# source files (one for each table) and the assets/inlined objects (one for each row) are generated.
- Generating C# sources: C# sources can be generated from data source page. You can also exclude some tables/fields from generation. If you want to add your own fields/methods to generated classes, read this guide.
- Generating assets: assets are generated during export job execution. C# source files should be up-to-date, they should have all supported/included database fields, otherwise exception is thrown and C# source files generation should be run to update source files.
Unsupported fields
Most of the fields, including assets and relations are supported. The following fields are excluded because they are not supported by Unity (hashtable, guid, ray, ray2D, listGuid, decimal, all nullable fields). The following fields rely on BGDatabase code and are also excluded (objectReference, objectListReference, objectListMultiValueReference, entityReference, entityReferenceList, id, action). If you exclude some table manually, all relational fields, referencing this table, are going to be excluded automatically.
How to change settings, table/field names
If you change folders, class name prefix or table name without any further action, you are going to lose the link between database data and existing assets or create duplicates next time you export/import data. This section describes, how to update folders, class name prefix, table or field names without losing links with existing assets. [Important] Backup your project just in case before renaming
Changing folders
After changing folders in the settings, move the folders manually inside Unity Editor to new location.
Changing classes name prefix
After changing Classes name prefix in the settings, rename all generated C# source files inside Unity Editor to reflect the change,
for example if your source file is S_MyTable.cs, and you change the prefix from S_ to T_ the new name should be
T_MyTable.cs. After changing all file names, regenerate C# sources for scriptable objects and fix all compilation errors
by changing class names from old name (S_MyTable) to new name (T_MyTable) in your C# code.
Renaming table name
After renaming table name, rename both the C# source file name and folder name for generated assets inside Unity Editor to reflect the change.
For example, if the old name is MyTable and the new table name is MyTableUpdated and Classes name prefix is S_,
rename C# source file from S_MyTable.cs to S_MyTableUpdated.cs and folder name from MyTable to MyTableUpdated.
After changing C# file name and folder name, regenerate C# sources for scriptable objects and fix all compilation errors
by changing class name from old name (S_MyTable) to new name (S_MyTableUpdated) in your C# code.
Renaming field name
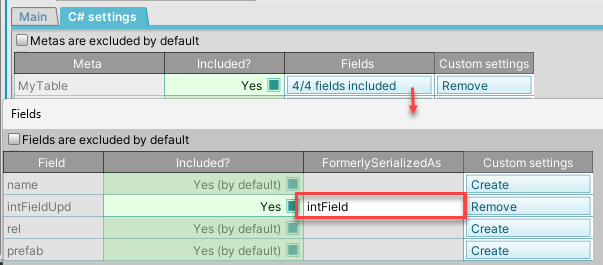
if you want to change field name and then re-generate both C# sources and the assets, there is no need for extra actions. If you want to rename the field and regenerate C# sources without re-generating the assets, you need to add FormerlySerializedAs attribute to the C# field with value, equal to the old name. After renaming database field, open data source page, then "C# settings", then create a custom settings for the table, include the table, open fields popup, create a custom setting for the field, include it and enter old field name to "FormerlySerializedAs" column. You can remove this setting after assets generating is executed.
Inlining objects
If you already use export/import with ScriptableObjects, back up your project before experimenting with object inlining. Classes generated with object inlining are not compatible with classes generated without it. If you switch from a ScriptableObject to a plain [Serializable] class, any existing assets created from that ScriptableObject will no longer be valid.
Inlining stores entities (rows) inside their parent objects. When a meta is inlined, its class is a regular serializable class, not a ScriptableObject. Instead of creating a separate ScriptableObject asset for each row, rows are stored inline within the parent asset or object. The parent object is determined by a relationSingle field, each child row references its parent row.
Example: suppose we have two tables, Countries and Cities. Each City row references a Country row. If City rows are inlined within Country rows,

the City class becomes a regular serializable C# class, and the Country ScriptableObject contains a list of inlined cities.

How it appears in the Unity Inspector

You can also inline a single entity instead of a list. In that case, ensure each child row references exactly one parent row and each parent row is referenced by exactly one child row, forming a 1:1 relation. During data export, this requirement is checked and an error is thrown if it's violated

Two restrictions on inlining entities:
- No direct references: You cannot reference an inlined object directly from scripts, access is only via its parent object.
- No incoming relations: Inlined entities must not have incoming relations, except for relations from other meta rows that are also inlined.
Customizing individual fields
You can customize export, import, and code generation for individual fields using C#. Create a class that inherits from BGSOFieldProcessor and place it in an Editor folder. BGSOFieldProcessor provides four methods you can override to control how a field is processed.
- IsApplicableTo: activates your processor for a particular field.
- OnCodeGeneration: customize the generated C# field name and type.
- OnEntityExport: transfer the value from the database to the ScriptableObject.
- OnEntityImport: transfer the value from the ScriptableObject back to the database.
Example code
using System.Collections.Generic;
using System.Linq;
using BansheeGz.BGDatabase;
using BansheeGz.BGDatabase.Editor;

//custom processor for converting DB Test.stringList field with List<string> type
//to scriptableObject intList with List<int> type
public class SOStringListToIntList : BGSOFieldProcessor
{
    //activates this processor for Test.stringList field
    public override bool IsApplicableTo(IsApplicableToRequest request) => request.Field.FullName == "Test.stringList";

    //adds C# field with "intList" name and List<int> type to the generated C# class instead of "stringList"
    public override void OnCodeGeneration(OnCodeGenerationRequest request) =>
        request.ClassBuilder.Add(new BGCodeGenClass.Field
        {
            Name = "intList",
            Type = "System.Collections.Generic.List<int>",
            IsPublic = true,
        });

    //copy value from the database row to the scriptable object (executed on export)
    public override void OnEntityExport(OnEntityExportRequest request)
    {
        //S_Test is the name of the scriptable object C# class
        var scriptableObject = (S_Test)request.Asset;
        //downcast field to the target type
        var stringListField = (BGFieldListStringContract) request.Field;
        //get db value
        List<string> dbList = stringListField[request.Entity];
        //convert the list of strings to the list of ints
        List<int> intList = dbList?.Select(int.Parse).ToList();
        // scriptableObject.intList field should be generated in OnCodeGeneration method
        scriptableObject.intList = intList;
    }

    //copy value from the scriptable object to the database row (executed on import)
    public override void OnEntityImport(OnEntityImportRequest request)
    {
        //S_Test is the name of the scriptable object C# class
        var scriptableObject = (S_Test)request.Asset;
        //downcast field to the target type
        var stringListField = (BGFieldListStringContract) request.Field;
        //get SO value (intList should be generated in OnCodeGeneration method)
        List<int> intList =  scriptableObject.intList;
        //convert the list of ints to the list of strings
        List<string> dbList = intList?.Select(value => value.ToString()).ToList();
        // set database value
        stringListField[request.Entity] = dbList;
    }
}